Search This Blog

Saturday, July 9, 2011

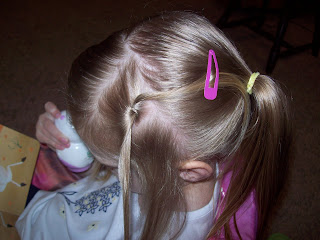
The "Y" Braid

This is a easy one that is also lots of fun and holds up great!
You can either start like we did here with four little ponies on the front of her head and then go back, or you can just start with two pig tails and do just one braid. Watch the pictures and then go to the bottom of the post to here how to do the braid. It is pretty simple and is just the same braid for the whole hair do.
To do the braid all you have to do is take 1/3 of each pig tail and place them together. this is one strain of the braid. Then, the sections left in each pig tail are the other two sections. Last, just take those sections a do a simple braid.
We did this with both side of her hair and then added the rest of the hair to them to make two more pig tails.


We then divided the hair from there again and did the same braid. We love this one and it is quick, easy, and cool on ha hot summer day! Also we have to give out some props to my mom aka Mimi who made this cute dress for the little miss! Thanks, Mimi!

Friday, July 8, 2011

The 4th of July Hair

Well I hope everyone had a great 4th of July! Ours was filled with family, friends, and BBQ, yum yum! Sorry it has been a while for a post, but it has been crazy around here. Well any way, my little princess and I found this hair do on the net and she just had to have some firework hair. I think it had everything to do with the glow sticks (see the end of the post!).


First, start by parting her hair in five sections. the part from ear to ear should be on the back side of the ears. this will help in the long run because you will need most of the hair on the top section to form the design. the bottom section should be divided into to equal sections. The top part shall be divided into three sections with the one in the middle double the size of the other two.
 Next, you will divide the top middle section into two section and do two twist braids. If you do not know how to do these they are easy. Take two sections of hair and twist each section one direction and then take them and twist them together in the other direction. Once you have the twisting done secure it to the lower sections with bands.
 Now, do the same twist braid with the two outer sections, but cross the braid over and secure to the opposite side lower section as shown.
 You could stop there but with my little girl we took it one step more! (Don't mind the messiness of the hair this was after a long 4th of July swimming day!) We took glow sticks and secured them to her hair with her bands. As I look at it more I should have put one across the top of her hair to finish off the star (Oh well there is always next year!). She loved it and felt so special! I also loved it because with her only being three it was easy to keep track of her when the fire works were being shot off.

It even held up for day two of fireworks! Hope everyone had a great 4th!

Monday, May 30, 2011

My First Blog Award!

This morning I start off with some exciting news! I have received my first blog award!! Thanks to Ashley DaMitz over at The Mommyhood Adventure. She honored me with the.....


Now according to tradition I have to share 7 little known facts about myself and then I have to pass this award on to 10 other stylish bloggers that I know. So, without further adieu...

1) I am very jealous! I have few things that make me jealous. Like I could care less if you have a better car, house, or cloths than me, but if you try to "mess" with my husband it makes me crazy!! Like over the edge jealous! I know it is bad and it is something that I am trying hard to work on!

2)I Love Peanut butter and Bananas! Nothing is better that smearing some peanut butter all over a banana. I know call me Elvis if you want but it is great!

3) I wish I was skinny. I put a big front that I am ok with my body and the way god made me but inside I am not and I am very envious of "skinny girls!" (Like my sister!)

4) I am not a girly girl, but I can not go anywhere without some toe nail polish on. Not even if I have my boots on and you can't see my toes.

5) kind of goes with #4 but, I can't stand finger nail polish! I just do not like how it feels on my hands.

6) I hate the word "Hate." This is a long one for me, from back to when I was eleven. Just before my brother died the last thing I told him was I hated him. Now I know that it was just a brother sister fight and that is what they do. And I know that he knew I did not hate him, but it was something that stuck with me. So you will hardly ever find me using the word hate and never when it comes to referring to a person. I might strongly dislike someone, but I will never hate them. You just never know what tomorrow will bring.

7) I love my pool! I know that I complain a lot about the expense and the upkeep, but it is great once we have great friends over to just relax in it. I can not wait for it to get open up and I am planning a day with just my girl friends to come over and enjoy the pool with me!

Here are the ten bloggers I feel deserve the Stylish Blogger Award:


These are all blogs that if I see a new post I have to go read it. You should swing over to these blogs and show them some love. If you can only make it to one blog please stop by The Mommyhood Adventure and show Ashley all the love you can. I promise you will never be disappointed in her post! Thanks Ashley for my first award!


Friday, May 20, 2011

The long hair princess do!

This one is not so simple at first, but once you get the hang of it, it will take you no time at all. The best hint I can give on this one is to have your daughters head completely wet when attempting this do!

First, start by parting the hair from one side of her hair to the other on the back side of the ears. then part that section down the middle.

Take each section and braid with a simple braid and band off. The best place to put this braid is at the bottom and back of the section.

Pull the two braids together in the back of the head. It is important to make sure the remainder of the hair is smoothed down.

Here is where the look comes in! Start by taking little sections of hair right below the start of the braid twist it and then wrap it around the braid once. Then, take that section of hair and add it to the next small section of hair twist and wrap it around the braid. Do this until you get to the place where the two braids meet and secure.

This is what one side looks likes. Now do the same with the other side!

Here is the finished product.  We finished it of with just a fun band.

Ode to My Best Friend(s)!

Well yes I know that I am a "hair blogger," but I am reallying getting into whole blogging thing and though it might be a great way to let out some of my feelings. So please just bare with me and I promise the next blog will be about hair. (actually I still have some waiting to be posted!)


A few weeks ago my little princess came to me and told me that I was her best friend. Of course this made me smile from ear to ear with pride. At that point a couple thoughts came to my mind; I must be doing something right by her, and how rich I was with all of my great friends. I soon came to realize that I could no longer say I have just one best friend. So this is just a run down and a ode to all of the great people in my life.


The long time best friend- Oh my Whittle, the longest best friend ever! Even though we do not see or even talk to each other enough she is the one person who I can just pick up a conversation with like we just saw each other yesterday. No matter how my day is going when I talk to her she always makes me laugh. I love that she does not hold it against me that I get to busy to call or stop by, but that she just cherishes the time that we have together.


The crimson best friend- For some reason my parents thought it would be a great idea to have me and my sister eight years apart. With that big of difference for years we did not see eye to eye and we were on complete different spectrum's of the universe. When I wanted to play with barbie dolls she wanted to play with boys. When I wanted to play with boys she wanted to have babies. But as we both grew so did our relationship. She is the one who is always there making me do my best and always being a cheer leader in my corner. She believes that I can achieve anything and I love her for that very reason. We still don't always see eye to eye, but we are always there to see the other one trough what ever life brings our way.


My puzzle piece best friend- I truly believe that your spouse should be your best friend and well mine is! He was one of my best friends even before we started dating. He probable knows me better that I know myself even. I can never hide my emotions from him, he knows me like a book. Some times that is not so good, but those times that I just need a shoulder to cry on it is great. I know that some times I go CRAZY on him but isn't that what wives are for! (hee hee) I think a great marriage has its ups and downs. I appreciate him holding in there with me through the rough times. He really is my puzzle piece, the one I fit perfectly with. He is my peas and carrots!

My air vent best friend- She is the one that I can tell anything to, good bad or indifferent. She listens to everything that I have to say and never tells me what she "thinks" I should do or holds anything I say against the person that I am venting about.  She told me something just the other day that has stuck with me. I was not in the best of moods to say the least and instead of just giving me her advice of what she would do or tell me how jerky the person I was venting about was she just said, "Lianne, I will support you in what every you decide to do." Now I think everyone should have that kind of person in their corner, because that was simply the best thing anyone could say to me at that moment. She was gone out of my life for a little while and now I am so glade she is back!!

My crazy story best friend- She is the one that I love to run to and tell all of my crazy stories to. She is the one that listens to the whole story and laughs the whole way through! (For those of you that know me you know that listening to one of my stories all the way through is an accomplishment.) I love that she accepts me totally for who I am. Even if I tell crazy stories and am afraid of wasps! I love that I can act crazy with her and that neither one of us cares who is looking. We are just who we are and we both are very secure with that.

My role model best friend- Of all the people in the world there is only one I really look up to. My mother gives her heart and sole to everything she does. She is the best mother, wife, and grandmother anyone could ask for. I wish that one day I could only be half the women that she is. There is not much more to say about her other than she is AMAZING!!!

My newest best friend- After Madison's told me the other day that I was her best friend I did some thinking, I think she is right. She is my best friend too. She is the one I spend all of my free time with. She is the one that if I am way from I can't wait to get back to. She is my everything! :)

I hope that everyone could have best friends like this! When was the last time you though about who your best friend(s) is/are. Who loves you for who you are? Who Listens to you? Who can read you like a book? Who gets you through what ever life brings your way? Who has your back? Who can you be crazy with?
Lianne

Thursday, May 19, 2011

Epic Fail Re-Do!

You guys may remember one of my post called Epic Fail. Well when you have a three year old they do not drop anything! So she really wanted the Cinderella hair do and well I am a sucker! Here is where we tried again!

We started by just a little pony tail on top of her head to secure her lose ends.


Next, we put the rest of her hair in a pony tail on the back of her head. (that is the step I missed the first time!) Then, we made a loop at the end of her pony tail and secured it with a band. We then slipped a 1" ribbon through the loop.

Next, just start rolling the ribbon and loop of hair up to the top of her head. It may not be pretty at this point, but trust me it will be in the end!

Once you reach the top of her head take the two ends of the ribbon and tie them in a knot. This will make a bun on her head.

Secure the bun to her head with Bobbie pins.

This is our final product. It is a lot better than the first time! You can also take a matching piece of ribbon and tie it around the front of her head to look more like Cinderella. Good luck and remember to always follow the directions and don't learn the hard way with a mad three year old!

Wednesday, May 18, 2011

Twist My Heart

This one is great for valentines day, but is also fun for just every day!!

Start by making a high pony tail on top of her head.


Do a back wards flip.

Next, divide the pony tail in two section and start twisting one section towards the front of the head. Then, take the other section and twist in the other direction.

Take the twist and make into the shape of a heart. secure the two twist together with a band and secure the heart shape to the hair with Bobbie pins.

We then added a cute bow to hide the band.

A Little Twisted!

Alright Ladies, This one is super cute and very versatile for all occasions and ages. This one is not the best one we have done, but is the only one I have pictures of. I threw this hair do up in just about 2 minutes as we rushed out the door for a baby shower! I was throwing a baby shower for my best friend who is FINALLY having a baby and had been running around all day to get things together. I went to go load Madi up in the car and realized she still had wet crazy hair from the bath tub so this is how it ended. (Yes I did some how find time for pictures!)

This one is so easy I do not even think you need pictures for a step by step. Just start by parting the hair any way you want. then take a small section of hair at the top of the head and just start twisting towards the back of the head. Follow her hair line around until you get to the point where you want to place the Pony tail. Have your princess hold that twist and then do the same thing to the other side of the part. when the two twist meet you should have all of the hair gathered up.


At this point you can do just about anything. We just left her hair in a side pony do for time sake. There is only two things to remember with this do; it is easier with dry hair (I learned that the hard way) and keeping the hair smooth is the only way to not get the lumps and it to look bad.

Also, just wanted to fill you in that my FAVORITE niece will be over this weekend with her long thick hair. She is my first hair do princess and we have not gotten to hang out just by our self's for a while. We are going to put the Madi to bed and just have some girl time. (We are only 13 years apart so it is more like an older sister relationship vs. and aunt relationship.) I think she has been dying to be a model for my blog and I have be dying to play with her hair. So, look forward to some hairdo's for teens and lots of braiding! (All things that I can not do with my little princess!)

Tuesday, May 17, 2011

The Fake Fish Tail

Have you ever seen a fish tail braid and I love the look but not the time it takes, yhea me too! So this is a cheat way we found that we just love and it only take a couple minutes. Really only a couple minutes and if you can do a pony tail you can do it! I like to do it with clear bands, but for the sake of showing well in pictures we did colored ones.

First, start with just a basic low pony tail.


Second, slide the band down about 1 1/2" to 2".

Next, Part the hair above the band in half and flip it from top to bottom of hair. Push the band up and tighten the flip to secure.

Next, go down the pony tail about 2" and place another band.

Divide above the second band into two half and flip and secure again.

This id what it should start looking like.

Finally, Just keep doing the same process until you get to the end of her hear. We got 4 flips on her hair but I have seen some with 7. I think when we were all said and done with this one we were 3 minutes. Yes, only 3 minutes!

Wednesday, April 27, 2011

Knot Piggies!

I am doing a happy dance! As of the time I am writing this post I have 6 (yes count them 6) Followers!! :) That is a long way from the 2 of yesterday. 

This is an attempt for a Easter hair do. Once I was done I did not think it was fancy enough for Easter, but I did think it was super cute and very easy!
I wanted to have her hair in some sort of one side like the other since I got some really cute clips to match her Easter outfit. So to me that pulled out pig tails of some sort. I started by dividing her hair in four sections. The middle part from side to side was from the front side of the ears and the one from her front to back of her head was a side ways part. I found it easier at this point to strap her hair down as to not get in my way. (Clips can go a long way) I put the back sections of her hair into the pig tails and the front section that I was not using clipped down to her head. Some times I am a little over whelmed wit all of that hair!


Next we started working with one section. I divided this section into two smaller sections and made a knot in the top section with putting the top strain pulled back to the pig tail and the other one down to the lower section of hair. If you need help with making the Knot check of my first blog post on it!

Then, I moved on to the lower section. I made a knot in this section with using the lower section of hair for the knot above. Both strains were then pulled back to the pig tail and secured.


I moved on to the next front section and did the same thing, but since this side was bigger (due to the way I parted her hair) it did three knots on this side. I just kept chaining them along till I reached the last section of hair and then put both strains back to the pony tail and secured them.


This is what the finished pig tail looks like (this is just my picture order being messed up!) Look at those cute clips from Jstyles, I just LOVE them!!!

Back onto the hair do! I divided the pig tails into two sections.

Then of course we made another Knot! (See the trend) I had the little monkey hold one side so it stayed tight.

Last I took the one of the ends and wrapped it around the other to hide all of the bands I used. I secured the end with a bobby pin hidden under the pony tail.

Here is the final product, I love it! It was so easy and held up well after a long day of playing!

Tuesday, April 26, 2011

Easter and Chutes and Ladders!

Hope you all had a wonderful Easter, I know we did! My little monkey did lots of egg hunting and ate even more candy!! :) We attempted to make it to church with my side of the family, but that was a bust! Sorry it has been awhile since I posted but it was a crazy weekend! Thanks to Ashley D. at themommyhoodadventure.blogspot.com/ I will be able to post more often (she clued me into scheduling my post). If you have not gotten a chance to check out her post go over and do it! She is a great writer and is very open about her experiences in motherhood. And as we all know motherhood is an experience EVERY day!
All ready for Church! (At least we tried!)

The hunt is on! It was big business for her!

Now on to the hair do! We found this one on another site and just fell in love with it. I think we have done it two or three times since. My little girl is still trying to grow out her bangs so we like any do that pulls them back (usually a MUST in our do's)! First start by parting off the top section of hair.


Then box off that top section. This will be the section of hair you will be working with( I put the sections I was not using in bands to keep it out of my way).


Then, take the front fifth of the section and band off to one side.(A chute)
Then continue on the the next fifth (A ladder) start by banding off one section and use that pony to the next section and so on till you are at the end of the ladder. Then band it to the section above (Oh that might not make sense). The best I can say on this one is look at the picture above it really does say a thousand words!! :) Just keep going with alternating chutes and ladders till you make it to the end of your section of parted hair (as shown in picture above).


Next we decided to part down the middle and make pig tales!


You can do lots of different things with the back of the hair; leave down, pigtails messy buns, or even just a pony tail. This one held up so well that the next day I just put it up the back in a high pony tail and we walked out the door. It is great when you can do a hair do for two days!


Always,
Lianne