Search This Blog

Wednesday, April 27, 2011

Knot Piggies!

I am doing a happy dance! As of the time I am writing this post I have 6 (yes count them 6) Followers!! :) That is a long way from the 2 of yesterday. 

This is an attempt for a Easter hair do. Once I was done I did not think it was fancy enough for Easter, but I did think it was super cute and very easy!
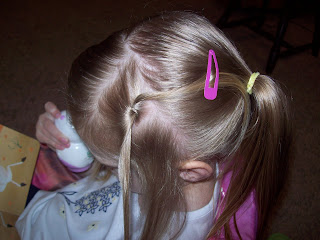
I wanted to have her hair in some sort of one side like the other since I got some really cute clips to match her Easter outfit. So to me that pulled out pig tails of some sort. I started by dividing her hair in four sections. The middle part from side to side was from the front side of the ears and the one from her front to back of her head was a side ways part. I found it easier at this point to strap her hair down as to not get in my way. (Clips can go a long way) I put the back sections of her hair into the pig tails and the front section that I was not using clipped down to her head. Some times I am a little over whelmed wit all of that hair!


Next we started working with one section. I divided this section into two smaller sections and made a knot in the top section with putting the top strain pulled back to the pig tail and the other one down to the lower section of hair. If you need help with making the Knot check of my first blog post on it!

Then, I moved on to the lower section. I made a knot in this section with using the lower section of hair for the knot above. Both strains were then pulled back to the pig tail and secured.


I moved on to the next front section and did the same thing, but since this side was bigger (due to the way I parted her hair) it did three knots on this side. I just kept chaining them along till I reached the last section of hair and then put both strains back to the pony tail and secured them.


This is what the finished pig tail looks like (this is just my picture order being messed up!) Look at those cute clips from Jstyles, I just LOVE them!!!

Back onto the hair do! I divided the pig tails into two sections.

Then of course we made another Knot! (See the trend) I had the little monkey hold one side so it stayed tight.

Last I took the one of the ends and wrapped it around the other to hide all of the bands I used. I secured the end with a bobby pin hidden under the pony tail.

Here is the final product, I love it! It was so easy and held up well after a long day of playing!

Tuesday, April 26, 2011

Easter and Chutes and Ladders!

Hope you all had a wonderful Easter, I know we did! My little monkey did lots of egg hunting and ate even more candy!! :) We attempted to make it to church with my side of the family, but that was a bust! Sorry it has been awhile since I posted but it was a crazy weekend! Thanks to Ashley D. at themommyhoodadventure.blogspot.com/ I will be able to post more often (she clued me into scheduling my post). If you have not gotten a chance to check out her post go over and do it! She is a great writer and is very open about her experiences in motherhood. And as we all know motherhood is an experience EVERY day!
All ready for Church! (At least we tried!)

The hunt is on! It was big business for her!

Now on to the hair do! We found this one on another site and just fell in love with it. I think we have done it two or three times since. My little girl is still trying to grow out her bangs so we like any do that pulls them back (usually a MUST in our do's)! First start by parting off the top section of hair.


Then box off that top section. This will be the section of hair you will be working with( I put the sections I was not using in bands to keep it out of my way).


Then, take the front fifth of the section and band off to one side.(A chute)
Then continue on the the next fifth (A ladder) start by banding off one section and use that pony to the next section and so on till you are at the end of the ladder. Then band it to the section above (Oh that might not make sense). The best I can say on this one is look at the picture above it really does say a thousand words!! :) Just keep going with alternating chutes and ladders till you make it to the end of your section of parted hair (as shown in picture above).


Next we decided to part down the middle and make pig tales!


You can do lots of different things with the back of the hair; leave down, pigtails messy buns, or even just a pony tail. This one held up so well that the next day I just put it up the back in a high pony tail and we walked out the door. It is great when you can do a hair do for two days!


Always,
Lianne

Saturday, April 16, 2011

Epic Fail!

Well my little princess and I found on another site how to do a Cinderella hair do. It looked really easy and the blogger said it was easy too. So we decided to give it a try.
She said to start with a half pony on top of the head. This worked for us since we do a lot of these anyway. (We are in the process of growing out her bangs so other way we would have hair going every where!)

Then you were to gather all of the hair and slide your hand to the bottom. (I was still doing good at this part!)

Then you were to take at least 1" ribbon and place over hair then flip hair and secure with a band. This is what happened when did. She said it would look messy but to just go on that part would be hidden. I went on, but it was so bad I did not take pictures! You were suppose to roll it up and then tie the ribbon and secure to head with bobby pins. It was so low on her head and looked horrible. it was a FAILURE!!!!

This is what we ended with. Not great, but trust me better than what we had. (I must say though, her daddy did her hair yesterday and it looked much better than this! Her used lots of clips and I was proud of him.) Oh well live and learn! Another day another hair do! I will try again some day but I am not holding my breath.

Oldies but Goodies


These are some photo's that I have pulled up from hair do's past. No step by step but they should be pretty self explanatory.

We are a big football family and this is one she ask for a lot! She calls it her Football Hair! It is just two messy buns on the side of her hair!
When she was little we did alot of half ponies on top of her head!
We are also BIG pig tail fans!

This is the half pony on top of her head again, but I had to show this one (not because I look so great in it!) because we did this a lot when she was little and some lady at the wal-mart told me it made her look like and alien. I think not!!!

Just another picture to show you that a simple clip goes a long way!
Have a great day!

Divided Pig Tails!

This one is quick and fun!
Start by doing two parts. One from the back side of ears across head. then split that evenly into two sections.

Place one section into a band at the center back side of the section.

Do the same to the other side.

Now continue the the part on the center part of the head the rest of the way down the head to divide the hair into two sections. Gather the hair of one section and the pony tail directly above it and place it in a band. I twisted the pony from above to help min. fly aways! (I do not like to use any hair spray or product on her hair) Do the same to the other side.

Now I just got some cute little clips and placed them over the bottom bands. This one held up very well and was so stinkin' easy it think pictures and all it only to 3 minutes! (This goes out to my friend Mo) Also, if you notice I do not always have to give her the Ipad to get hair done. This time she read a book!

A fliping split!

Here is just a pic of how we started off the day! I love when she is so happy!

Start by parting her hair front side of ears up.

Divide the front part into two section.

Make a pony tail on one side. Pull the band off of her head giving enough room to take the hair and flip under (also called a toppies tail). Then, side the band as far back down to her head as you can to secure it.

Do the same with the other side.

Now do another part in her hair for the back side of the ears. Divide this part into three sections. Split the two upper flips into two pony tails each and add to three lower sections. (One to each outside section and two to the middle section.) See picture below it is hard to explain but easy to see!!!

Now secure each section with a band and do the flip to all three.

Now you can finish it off in several way. I chose to just pull it back into a pony tail to keep it off her neck on a hot day. You could also just leave it down, keep it going till you have no more head room, or flip the last pony tail too, you chose! Our babysitter said she loved this one and that it held up very well all day. To me that is success!!!

Monday, April 11, 2011

Tools of the Trade

I think the battle over hair is a never ending battle between a mother and a daughter. My niece is 14 and her mother and her still fight over hair! However, when I do her hair the world is in harmony. Is it because I am better than her mother at doing hair? (I wish!) Nope it is just that I am not her mother!  My daughter and I have had our share of fights about it, but from each I have learned and here are some of those lessons.......

  1. Know when to pick your battles- if it is not a necessity to have her hair just perfect for the day and she is not in the mood, just don't do it! There are times more often than not that my little girls hair is just pulled back with a clip because us getting in a fight is just not worth a hair do that will last for only a couple hours! I feel that some times these do's are just as cute and a nice clip can go a long way.
  2. Let her have a chance to shine- My little girls is always wanting to do what ever I do. So in turn if I do her hair she wants a chance too. I have found that if I let her "get the knots out" before I do her hair she feels that she has a part in the hair style. I also feel that this is good for her to start learning how to brush her own hair. I also on occasion let her do my hair. Now of course when she is done it is never anything I can go out of the house with, but it actually feels good to have someone else running their fingers through my hair and she is is happy (the most important thing to me!).

3. Give her something to do- I have found that if the t.v. is in the direction I want her to turn her head I am in good shape for the most part. I try to use her little princess chair for her to sit in and watch the t.v. and I just move around it as to not disturb the zone out on Micky Mouse she has going on. I don't really like her to zone out on the t.v., but for the five min. I usually spend doing her hair it is worth it to me. I have also found my greatest weapon is my IPad. She loves it and wants to "play with it" just like mommy. I know some of you are thinking "A three year old with an IPad, no way!" But, it works for us. She gets the time to play with it, I am not always the bad guy saying NO, she is sitting still (less opportunity for it to get dropped), and I can monitor what she is doing on it.


4. Last Have the right Items-I have found that trying to do her hair with out the right brush, comb, or spray is pointless! It took us many attempts to find the right hair brush that she liked how it felt on her and that I liked how it got the knots out. (With as long as her hair is and as hard as she plays their are always lots of knots!) The comb is the biggest item to all of our hair do's. It is how we get all of our parts and how I can (on occasion) get things smooth. I also could not do her hair with out my "no more tangles" spray bottle. Notice I did not say spray because ours just has water in it now because that does the trick and is free! That fine mist that comes out is just perfect.
Last but not least we could not pull any of it off without our hair bands and clips. We have ourselves a little collection that just keeps growing! I seem to find when it comes to bands the right one for the right application is a must. My daughter has thin hair so when we do most detail stuff on the top of her head we use the ouchless small rubber bands. They are so cheap that if you stretch them out there is not worries about throwing them away (and it is funny trying to watch her daddy take them out of her hair). We do the rest of her hair (like larger pony tails) with just a normal hair band. I have found it easy to match up outfits with her hair accessories by just getting a piece of ribbon and tying it to a hair band, cheap and cute. Of course I can not forget our clips! She has a clip in her hair on most days unless I am feeling lazy. I have been asked many times if I make these clips and the answerer is nope! I have to give credit where credit is due, these really cute clips are made mostly by  Jstyles http://www.facebook.com/#!/pages/Jstyles/169941193040038 , a company ran by a friend of mine from high school. She does a great job and wows me with all of her new items every time!

The Knot

This one is fun, simple, and I am asked a lot how I do it!
First start by making a box part on the top of her head. (please don't mind the photo's they were taken after her hair had been done for hours!)
Next, part the box into two sections with a diagonal part. Place the section in the back in a pony tail with a band.
Then, take the front part and separate into two sections. Take those two and tie in a knot. (Like if you were starting to tie your shoe)
Secure this section of hair to the other pony tail with another band.
Place on a bow or clip to hide the bands and you are done! I did this one this morning on the way out to the doctor and it only took 3 min. start to finish!